The GQ GMC-300E Plus
Have you ever bought something and then realized that you are not at all sure how to use it? This happened to me a couple of weeks ago when I bought a small Geiger counter in an Amazon flash sale. Stay with me for the next few xanax pages as I work out the basics of the machine and run my first few tests. Please bear in mind that I have absolutely no experience or qualifications so it is entirely possible that what I write is incorrect. If you spot any errors, don’t hesitate to correct me using the comment function.
ambien online
Googling, you will find a couple of low priced Geiger-Mueller counters. I was initially looking for a Terra P device to take with me on a sightseeing tour to prednisone Chernobyl. It is the model that most of the local tour firms use and looks reasonably robust and easy to use. In the end though, I went for a US made GQ GMC-300E Plus which, unlike the Terra P, has a built in data logger which can record several days of radiation readings for upload and viewing on a computer. With a bit of luck, this feature should allow me to relive my Chernobyl adventure on my return by checking the dosage plots over and over again!
prednisone get
Rooting around in a number of internet forums, I think that I have worked out that raw measurements on a Geiger counter come in the form of “counts”. A count occurs every time ionizing radiation (beta, gamma or x-rays) strike the detector tube and causes a burst of current in the circuit that is connected to it. The number of counts detected per minute by a particular tube depends on its size and design, and doesn’t really give much in the way of meaningful information until the counts are translated into a more standard measure such as micro Sieverts per hour or milliroentgens per hour. The documentation for my machine told me that counts per minute (CPM) multiplied by 0.0065 should give the dosage in micro Sieverts per hour.
Calibration
Once I had got my head around how the 300E Plus worked, I was curious to know how acurate the dose that it indicates was. The machine allows you to do a three point calibration by entering low, medium and high count numbers, and the corresponding doses in micro Sieverts/h. This is easy if you have access to a set of sample materials with known levels of radioactivity. Needless to say I did not, but I did find an alternative, at least for calibrating the low end of the scale. Germany has a network of measuring stations that upload real time radioactivity readings to the internet. All I had to do was to visit one of them and compare the readings on my machine to the ones the station was uploading to the internet. I made my way to my closest station (in Ruit near Stuttgart) and found that my readings were slightly high. I decided that this was better than the other way round and left them that way. If you are in Germany and are interested in finding your closest measuring station, you can find it at http://odlinfo.bfs.de/DE/index.html.
How much radiation is too much?
My Geiger counter comes with a credit card sized plastic cheat sheet which suggests that 0.03 to 0.33 micro Sieverts per hour is a normal background level. Here in the south of Germany I am getting an average of about 0.17 micro Sieverts per hour.
Many locations in the city of Pripyat in the Chernobyl exclusion zone give levels of between 0.3 – 1.3 micro Sieverts per hour but some areas have significantly higher levels. The cemetery for example has levels of 14-22 micro Sieverts per hour. Probably not an issue for the current residents but not the sort of place you want to hang around in!
Practical tests
Gamma radiation is everywhere and is attenuated very effectively by the earth’s atmosphere. If you go up a few kilometers in an airplane you will experience radiation levels that are many times higher than those at ground level. As luck would have it, shortly after buying my Geiger Counter I was due to fly to Berlin. The perfect opportunity to test my machine!
I set the data logger to save readings every minute. The GMC-300E Plus has an alarm so before I popped the machine in my carry on bag, I turned this off to prevent embarrassing bleeps during the flight.
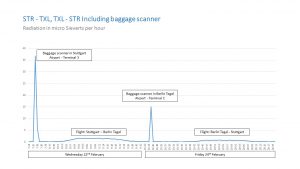
Connecting the GMC-300E Plus to a computer and uploading the data is a bit fiddly but very doable. The data recorded is just counts per minute so you have to apply the conversion factor in Excel to get your chosen dosage numbers (I used count x 0.0065 to get micro Sieverts per hour). On the graph below the two big spikes are caused by the x-ray baggage scanners. The one in Stuttgart seems to be about twice as powerful as the one at Tegel! Click on the graph to get a bigger copy.
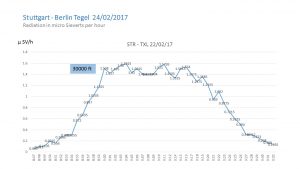
The next graph strips out the baggage scanner spikes so you can get a clearer view of the flight data. The first one is the outbound flight to Berlin where we flew at 30000 feet. We experienced radiation levels roughly equivalent to those we would have got hanging around the iconic Ferris wheel at Pripyat.
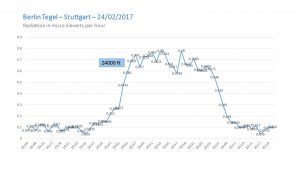
On the trip home we flew somewhat lower – only 24000 feet. This resulted in MUCH lower radiation levels of around 0.75 micro Sieverts per hour. Still four or five times those on the ground.
In case you are wondering how I knew how high we were flying, it is really easy to get this information from flight tracker web sites such as flightradar24. Just enter your flight details and you will see a plot that looks something like this.
Anyway, watch this space for my Chernobyl field tests in a couple of months time. Until then, please feel free to leave comments…..


